商业票据教程
受众: 架构师,应用和智能合约开发者,管理员
本教程将向你展示如何安装和使用商业票据样例应用程序和智能合约。该主题是以任务为导向的, 因此它更侧重的是流程而不是概念。如果你想更深入地了解这些概念,可以阅读开发应用程序主题。
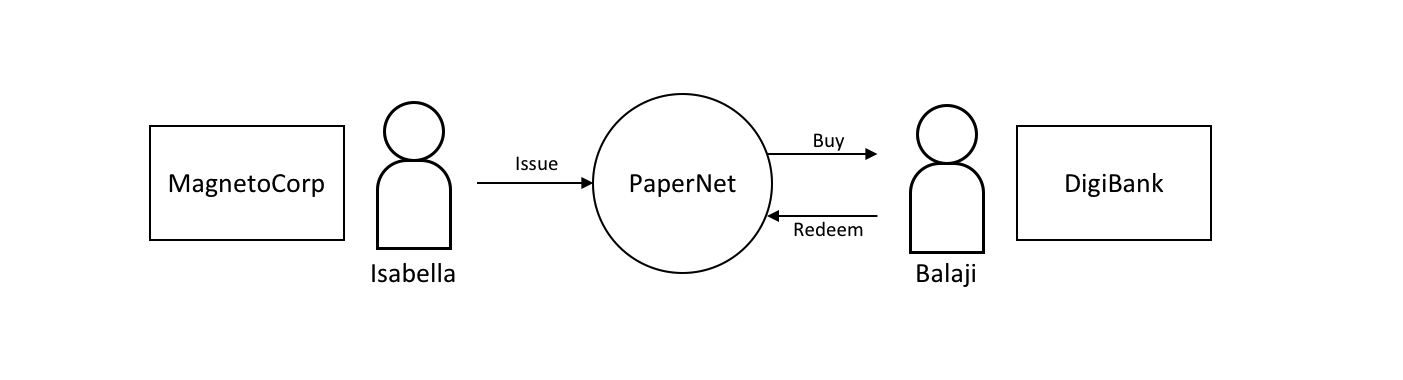 在本教程中,MagnetoCorp 和 DigiBank 这两个组织使用 Hyperledger Fabric 区块链网络 PaperNet 相互交易商业票据。
一旦建立了一个基本的网络,你就将扮演 MagnetoCorp 的员工 Isabella,她将代表公司发行商业票据。然后,你将转换角色,担任 DigiBank 的员工 Balaji,他将购买此商业票据,持有一段时间,然后向 MagnetoCorp 兑换该商业票据,以获取小额利润。
你将扮演开发人员,最终用户和管理员,这些角色位于不同组织中,都将执行以下步骤,这些步骤旨在帮助你了解作为两个不同组织独立工作但要根据Hyperledger Fabric 网络中双方共同商定的规则来进行协作是什么感觉。
- 环境配置 和 下载示例
- Create the network
- Examine the commercial paper smart contract
- Deploy the smart contract to the channel by approving the chaincode definition as MagnetoCorp and Digibank.
- Understand the structure of a MagnetoCorp application, including its dependencies
- Configure and use a wallet and identities
- Run a MagnetoCorp application to issue a commercial paper
- Understand how DigiBank uses the smart contract in their applications
- As Digibank, run applications that buy and redeem commercial paper
本教程已经在 MacOS 和 Ubuntu 上进行了测试,应该可以在其他 Linux 发行版上运行。Windows版本的教程正在开发中。
准备阶段
在开始之前,你必须安装本教程所需的一些必备工具。我们将必备工具控制在最低限度,以便你能快速开始。
你必须安装以下软件:
- Node The Node.js SDK README contains the up to date list of prerequisites.
你会发现安装以下软件很有帮助:
-
源码编辑器,如 Visual Studio Code 版本 1.28,或更高版本。VS Code 将会帮助你开发和测试你的应用程序和智能合约。安装 VS Code 看这里。
许多优秀的代码编辑器都可以使用,包括 Atom, Sublime Text 和 Brackets。
你可能会发现,随着你在应用程序和智能合约开发方面的经验越来越丰富,安装以下软件会很有帮助。首次运行教程时无需安装这些:
- Node Version Manager。NVM 帮助你轻松切换不同版本的 node——如果你同时处理多个项目的话,那将非常有用。安装 NVM 看这里。
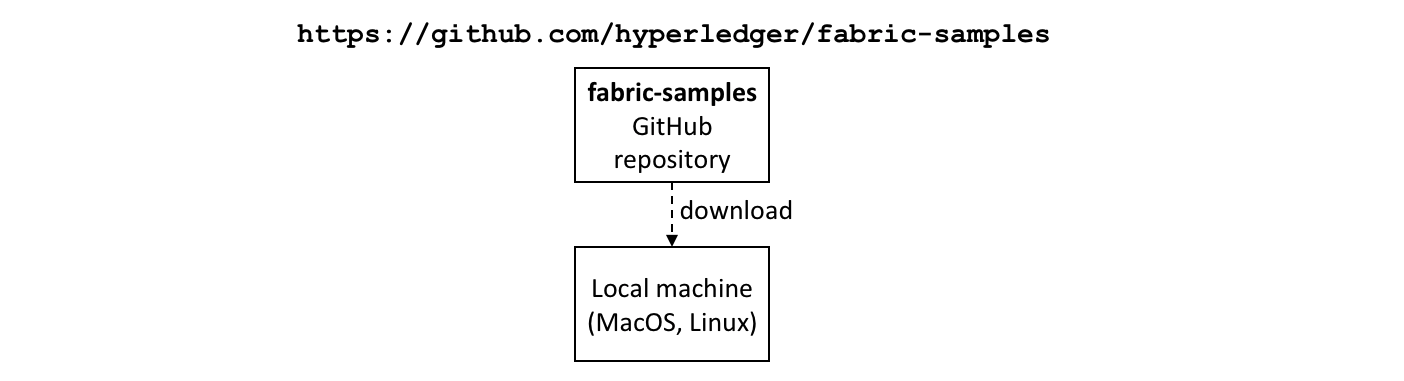
下载示例
The commercial paper tutorial is one of the samples in the fabric-samples
repository. Before you begin this tutorial, ensure that you have followed the
instructions to install the Fabric Prerequisites and
Download the Samples, Binaries and Docker Images.
When you are finished, you will have cloned the fabric-samples repository that
contains the tutorial scripts, smart contract, and application files.
 Download the
fabric-samples GitHub repository to your local machine.
After downloading, feel free to examine the directory structure of fabric-samples:
$ cd fabric-samples
$ ls

CODEOWNERS              SECURITY.md                 first-network
CODE_OF_CONDUCT.md      chaincode                   high-throughput
CONTRIBUTING.md         chaincode-docker-devmode    interest_rate_swaps
LICENSE                 ci                          off_chain_data
MAINTAINERS.md          commercial-paper            test-network
README.md               fabcar
注意 commercial-paper 目录,我们的示例就在这里!
现在你已经完成了教程的第一个阶段!随着你继续操作,你将为不同用户和组件打开多个命令窗口。例如:
- To show peer, orderer and CA log output from your network.
- To approve the chaincode as an administrator from MagnetoCorp and as an administrator from DigiBank.
- To run applications on behalf of Isabella and Balaji, who will use the smart contract to trade commercial paper with each other.
当你应该从特定命令窗口运行一项命令时,我们将详细说明这一点。例如:
(isabella)$ ls
这表示你应该在 Isabella 的窗口中执行 ls 命令。
创建网络
This tutorial will deploy a smart contract using the Fabric test network.
The test network consists of two peer organizations and one ordering organization.
The two peer organizations operate one peer each, while the ordering organization
operates a single node Raft ordering service. We will also use the test network
to create a single channel named mychannel that both peer organizations
will be members of.
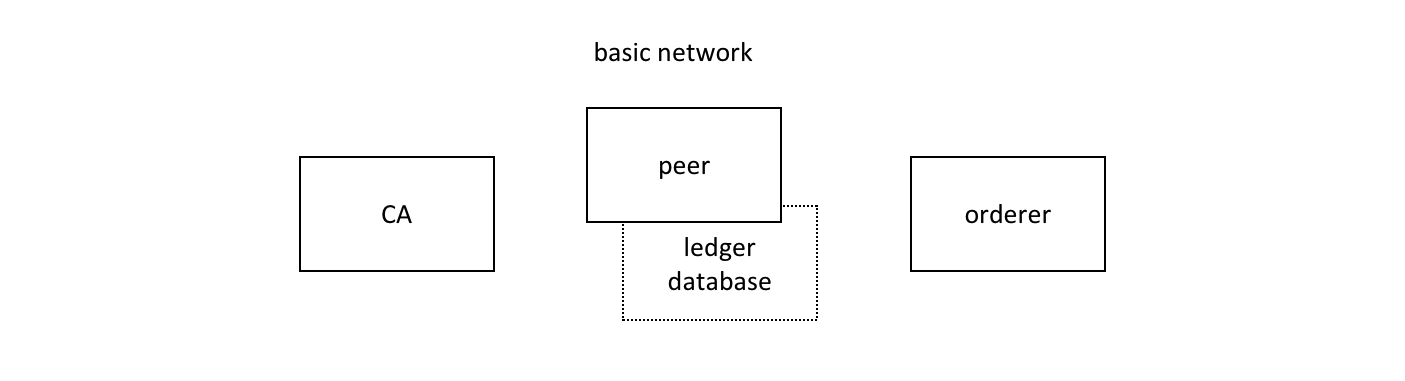 The Hyperledger Fabric 基础网络的组成部分包括一个节点及该节点的账本数据库,一个排序服务和一个证书授权中心。以上每个组件都在一个 Docker 容器中运行。
Each organization runs their own Certificate Authority. The two peers, the state databases, the ordering service node, and each organization CA each run in their own Docker container. In production environments, organizations typically use existing CAs that are shared with other systems; they're not dedicated to the Fabric network.
The two organizations of the test network allow us to interact with a blockchain ledger as two organizations that operate separate peers. In this tutorial, we will operate Org1 of the test network as DigiBank and Org2 as MagnetoCorp.
You can start the test network and create the channel with a script provided in
the commercial paper directory. Change to the commercial-paper directory in
the fabric-samples:
cd fabric-samples/commercial-paper
Then use the script to start the test network:
./network-starter.sh
While the script is running, you will see logs of the test network being deployed.
When the script is complete, you can use the docker ps command to see the
Fabric nodes running on your local machine:
$ docker ps

CONTAINER ID        IMAGE                               COMMAND                  CREATED              STATUS              PORTS                                        NAMES
a86f50ca1907        hyperledger/fabric-peer:latest      "peer node start"        About a minute ago   Up About a minute   7051/tcp, 0.0.0.0:9051->9051/tcp             peer0.org2.example.com
77d0fcaee61b        hyperledger/fabric-peer:latest      "peer node start"        About a minute ago   Up About a minute   0.0.0.0:7051->7051/tcp                       peer0.org1.example.com
7eb5f64bfe5f        hyperledger/fabric-couchdb          "tini -- /docker-ent…"   About a minute ago   Up About a minute   4369/tcp, 9100/tcp, 0.0.0.0:5984->5984/tcp   couchdb0
2438df719f57        hyperledger/fabric-couchdb          "tini -- /docker-ent…"   About a minute ago   Up About a minute   4369/tcp, 9100/tcp, 0.0.0.0:7984->5984/tcp   couchdb1
03373d116c5a        hyperledger/fabric-orderer:latest   "orderer"                About a minute ago   Up About a minute   0.0.0.0:7050->7050/tcp                       orderer.example.com
6b4d87f65909        hyperledger/fabric-ca:latest        "sh -c 'fabric-ca-se…"   About a minute ago   Up About a minute   7054/tcp, 0.0.0.0:8054->8054/tcp             ca_org2
7b01f5454832        hyperledger/fabric-ca:latest        "sh -c 'fabric-ca-se…"   About a minute ago   Up About a minute   7054/tcp, 0.0.0.0:9054->9054/tcp             ca_orderer
87aef6062f23        hyperledger/fabric-ca:latest        "sh -c 'fabric-ca-se…"   About a minute ago   Up About a minute   0.0.0.0:7054->7054/tcp                       ca_org1
看看你是否可以将这些容器映射到基本网络上(可能需要横向移动才能找到信息):
* The Org1 peer, peer0.org1.example.com, is running in container a86f50ca1907
* The Org2 peer, peer0.org2.example.com, is running in container 77d0fcaee61b
* The CouchDB database for the Org1 peer, couchdb0, is running in container 7eb5f64bfe5f
* The CouchDB database for the Org2 peer, couchdb1, is running in container 2438df719f57
* The Ordering node, orderer.example.com, is running in container 03373d116c5a
* The Org1 CA, ca_org1, is running in container 87aef6062f23
* The Org2 CA, ca_org2, is running in container 6b4d87f65909
* The Ordering Org CA, ca_orderer, is running in container 7b01f5454832
所有这些容器构成了被称作 net_test 的 docker 网络。你可以使用 docker network 命令查看该网络:
$ docker network inspect net_test

  [
      {
          "Name": "net_test",
          "Id": "f4c9712139311004b8f7acc14e9f90170c5dcfd8cdd06303c7b074624b44dc9f",
          "Created": "2020-04-28T22:45:38.525016Z",
          "Containers": {
              "03373d116c5abf2ca94f6f00df98bb74f89037f511d6490de4a217ed8b6fbcd0": {
                  "Name": "orderer.example.com",
                  "EndpointID": "0eed871a2aaf9a5dbcf7896aa3c0f53cc61f57b3417d36c56747033fd9f81972",
                  "MacAddress": "02:42:c0:a8:70:05",
                  "IPv4Address": "192.168.112.5/20",
                  "IPv6Address": ""
              },
              "2438df719f57a597de592cfc76db30013adfdcfa0cec5b375f6b7259f67baff8": {
                  "Name": "couchdb1",
                  "EndpointID": "52527fb450a7c80ea509cb571d18e2196a95c630d0f41913de8ed5abbd68993d",
                  "MacAddress": "02:42:c0:a8:70:06",
                  "IPv4Address": "192.168.112.6/20",
                  "IPv6Address": ""
              },
              "6b4d87f65909afd335d7acfe6d79308d6e4b27441b25a829379516e4c7335b88": {
                  "Name": "ca_org2",
                  "EndpointID": "1cc322a995880d76e1dd1f37ddf9c43f86997156124d4ecbb0eba9f833218407",
                  "MacAddress": "02:42:c0:a8:70:04",
                  "IPv4Address": "192.168.112.4/20",
                  "IPv6Address": ""
              },
              "77d0fcaee61b8fff43d33331073ab9ce36561a90370b9ef3f77c663c8434e642": {
                  "Name": "peer0.org1.example.com",
                  "EndpointID": "05d0d34569eee412e28313ba7ee06875a68408257dc47e64c0f4f5ef4a9dc491",
                  "MacAddress": "02:42:c0:a8:70:08",
                  "IPv4Address": "192.168.112.8/20",
                  "IPv6Address": ""
              },
              "7b01f5454832984fcd9650f05b4affce97319f661710705e6381dfb76cd99fdb": {
                  "Name": "ca_orderer",
                  "EndpointID": "057390288a424f49d6e9d6f788049b1e18aa28bccd56d860b2be8ceb8173ef74",
                  "MacAddress": "02:42:c0:a8:70:02",
                  "IPv4Address": "192.168.112.2/20",
                  "IPv6Address": ""
              },
              "7eb5f64bfe5f20701aae8a6660815c4e3a81c3834b71f9e59a62fb99bed1afc7": {
                  "Name": "couchdb0",
                  "EndpointID": "bfe740be15ec9dab7baf3806964e6b1f0b67032ce1b7ae26ac7844a1b422ddc4",
                  "MacAddress": "02:42:c0:a8:70:07",
                  "IPv4Address": "192.168.112.7/20",
                  "IPv6Address": ""
              },
              "87aef6062f2324889074cda80fec8fe014d844e10085827f380a91eea4ccdd74": {
                  "Name": "ca_org1",
                  "EndpointID": "a740090d33ca94dd7c6aaf14a79e1cb35109b549ee291c80195beccc901b16b7",
                  "MacAddress": "02:42:c0:a8:70:03",
                  "IPv4Address": "192.168.112.3/20",
                  "IPv6Address": ""
              },
              "a86f50ca19079f59552e8674932edd02f7f9af93ded14db3b4c404fd6b1abe9c": {
                  "Name": "peer0.org2.example.com",
                  "EndpointID": "6e56772b4783b1879a06f86901786fed1c307966b72475ce4631405ba8bca79a",
                  "MacAddress": "02:42:c0:a8:70:09",
                  "IPv4Address": "192.168.112.9/20",
                  "IPv6Address": ""
              }
          },
          "Options": {},
          "Labels": {}
      }
  ]
看看这八个容器如何在作为单个 Docker 网络一部分的同时使用不同的 IP 地址。(为了清晰起见,我们对输出进行了缩写。)
Because we are operating the test network as DigiBank and MagnetoCorp,
peer0.org1.example.com will belong to the DigiBank organization while
peer0.org2.example.com will be operated by MagnetoCorp. Now that the test
network is up and running, we can refer to our network as PaperNet from this point
forward.
回顾一下: 你已经从 GitHub 下载了 Hyperledger Fabric 示例仓库,并且已经在本地机器上运行了基本的网络。现在让我们开始扮演 MagnetoCorp 的角色来交易商业票据。
以 MagnetoCorp 的身份管理网络
The commercial paper tutorial allows you to act as two organizations by
providing two separate folders for DigiBank and MagnetoCorp. The two folders
contain the smart contracts and application files for each organization. Because
the two organizations have different roles in the trading of the commercial paper,
the application files are different for each organization. Open a new window in
the fabric-samples repository and use the following command to change into
the MagnetoCorp directory:
cd commercial-paper/organization/magnetocorp
我们要做的第一件事就是以 MagnetoCorp 的角色监控 PaperNet 网络中的组件。管理员可以使用 logspout 工具 。该工具可以将不同输出流采集到一个地方,从而在一个窗口中就可以轻松看到正在发生的事情。比如,对于正在安装智能合约的管理员或者正在调用智能合约的开发人员来说,这个工具确实很有帮助。
In the MagnetoCorp directory, run the following command to run the
monitordocker.sh script and start the logspout tool for the containers
associated with PaperNet running on net_test:
(magnetocorp admin)$ ./configuration/cli/monitordocker.sh net_test
...
latest: Pulling from gliderlabs/logspout
4fe2ade4980c: Pull complete
decca452f519: Pull complete
(...)
Starting monitoring on all containers on the network net_test
b7f3586e5d0233de5a454df369b8eadab0613886fc9877529587345fc01a3582
注意,如果 monitordocker.sh 中的默认端口已经在使用,你可以传入一个端口号。
(magnetocorp admin)$ ./monitordocker.sh net_test <port_number>
This window will now show output from the Docker containers for the remainder of the tutorial, so go ahead and open another command window. The next thing we will do is examine the smart contract that MagnetoCorp will use to issue to the commercial paper.
Examine the commercial paper smart contract
issue, buy 和 redeem 是 PaperNet 智能合约的三个核心功能。应用程序使用这些功能来提交交易,相应地,在账本上会发行、购买和赎回商业票据。我们接下来的任务就是检查这个智能合约。
打开一个新的终端窗口来代表 MagnetoCorp 开发人员。
cd commercial-paper/organization/magnetocorp
You can then view the smart contract in the contract directory using your chosen
editor (VS Code in this tutorial):
(magnetocorp developer)$ code contract
在这个文件夹的 lib 目录下,你将看到 papercontract.js 文件,其中包含了商业票据智能合约!
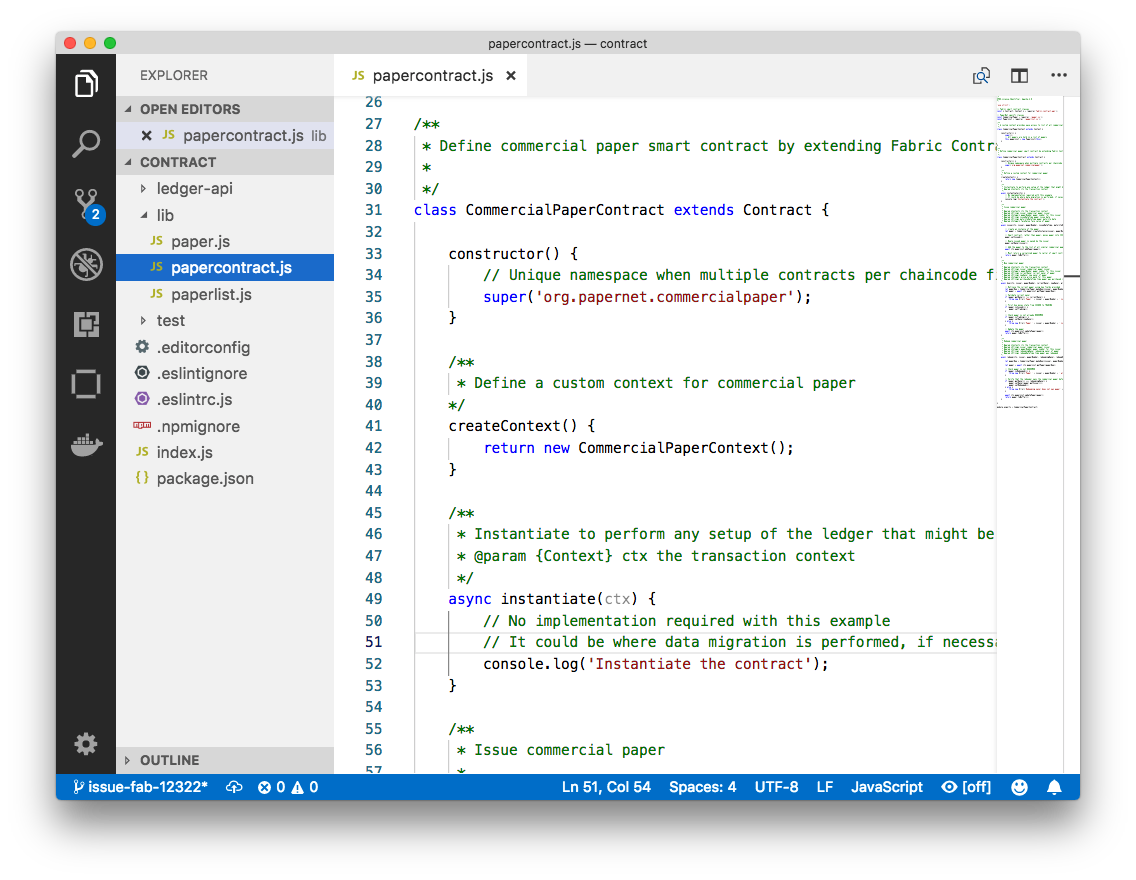 一个示例代码编辑器在
 papercontract.js 文件中展示商业票据智能合约
papercontract.js 是一个在 Node.js 环境中运行的 JavaScript 程序。注意下面的关键程序行:
const { Contract, Context } = require('fabric-contract-api');
这个语句引入了两个关键的 Hyperledger Fabric 类:Contract 和 Context,它们被智能合约广泛使用。你可以在 fabric-shim JSDOCS 中了解到这些类的更多信息。
class CommercialPaperContract extends Contract {
这里基于内置的 Fabric Contract 类定义了智能合约类 CommercialPaperContract 。实现了 issue, buy 和 redeem 商业票据关键交易的方法被定义在该类中。
async issue(ctx, issuer, paperNumber, issueDateTime, maturityDateTime...) {
这个方法为 PaperNet 定义了商业票据 issue 交易。传入的参数用于创建新的商业票据。
找到并检查智能合约内的 buy 和 redeem 交易。
let paper = CommercialPaper.createInstance(issuer, paperNumber, issueDateTime...);
在 issue 交易内部,这个语句根据提供的交易输入使用 CommercialPaper 类在内存中创建了一个新的商业票据。检查 buy 和 redeem 交易看如何类似地使用该类。
await ctx.paperList.addPaper(paper);
这个语句使用 ctx.paperList 在账本上添加了新的商业票据,其中 ctx.paperList 是PaperList 类的一个实例,当智能合约场景 CommercialPaperContext 被初始化时,就会创建出一个 ctx.paperList。再次检查 buy 和 redeem 方法,以了解这些方法是如何使用这一类的。
return paper;
该语句返回一个二进制缓冲区,作为来自 issue 交易的响应,供智能合约的调用者处理。
欢迎检查 contract 目录下的其他文件来理解智能合约是如何工作的,请仔细阅读智能合约处理主题中 papercontract.js 是如何设计的。
将智能合约部署到通道
Before papercontract can be invoked by applications, it must be installed onto
the appropriate peer nodes of the test network and then defined on the channel
using the Fabric chaincode lifecycle. The Fabric chaincode
lifecycle allows multiple organizations to agree to the parameters of a chaincode
before the chaincode is deployed to a channel. As a result, we need to install
and approve the chaincode as administrators of both MagnetoCorp and DigiBank.
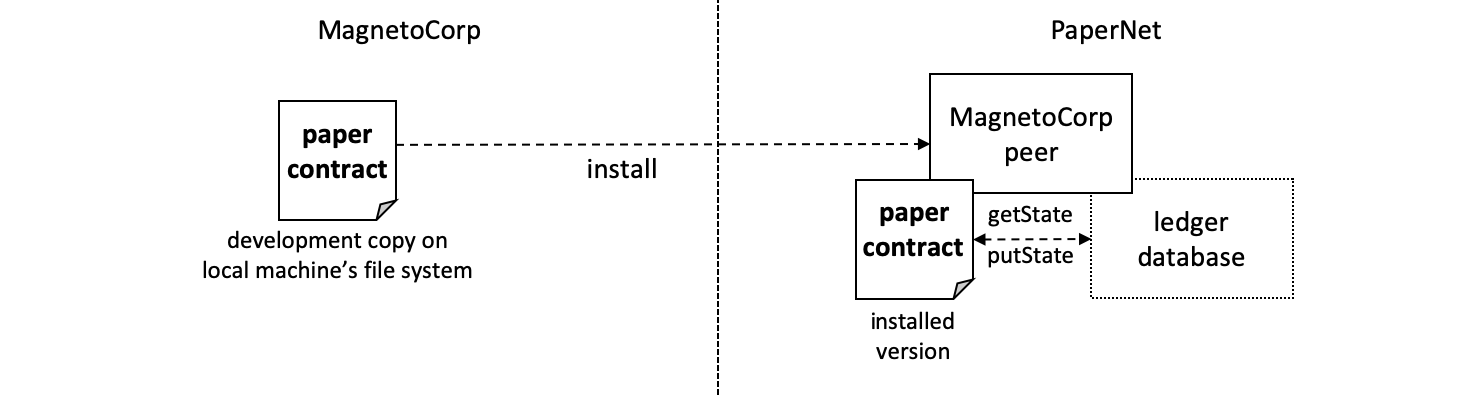 MagnetoCorp 的管理员将
 papercontract 的一个副本安装在 MagnetoCorp 的节点上。
智能合约是应用开发的重点,它被包含在一个名为链码的 Hyperledger Fabric 构件中。在一个链码中可以定义一个或多个智能合约,安装链码就使得 PaperNet 中的不同组织可以使用其中的智能合约。这意味着只有管理员需要关注链码;其他人都只需关注智能合约。
以 MagnetoCorp 的身份安装和批准智能合约
We will first install and approve the smart contract as the MagnetoCorp admin. Make
sure that you are operating from the magnetocorp folder, or navigate back to that
folder using the following command:
cd commercial-paper/organization/magnetocorp
A MagnetoCorp administrator can interact with PaperNet using the peer CLI. However,
the administrator needs to set certain environment variables in their command
window to use the correct set of peer binaries, send commands to the address
of the MagnetoCorp peer, and sign requests with the correct cryptographic material.
You can use a script provided by the sample to set the environment variables in
your command window. Run the following command in the magnetocorp directory:
source magnetocorp.sh
You will see the full list of environment variables printed in your window. We can now use this command window to interact with PaperNet as the MagnetoCorp administrator.
The first step is to install the papercontract smart contract. The smart
contract can be packaged into a chaincode using the
peer lifecycle chaincode package command. In the MagnetoCorp administrator's
command window, run the following command to create the chaincode package:
(magnetocorp admin)$ peer lifecycle chaincode package cp.tar.gz --lang node --path ./contract --label cp_0
The MagnetoCorp admin can now install the chaincode on the MagnetoCorp peer using
the peer lifecycle chaincode install command:
(magnetocorp admin)$ peer lifecycle chaincode install cp.tar.gz
When the chaincode package is installed, you will see messages similar to the following printed in your terminal:
2020-01-30 18:32:33.762 EST [cli.lifecycle.chaincode] submitInstallProposal -> INFO 001 Installed remotely: response:<status:200 payload:"\nEcp_0:ffda93e26b183e231b7e9d5051e1ee7ca47fbf24f00a8376ec54120b1a2a335c\022\004cp_0" >
2020-01-30 18:32:33.762 EST [cli.lifecycle.chaincode] submitInstallProposal -> INFO 002 Chaincode code package identifier: cp_0:ffda93e26b183e231b7e9d5051e1ee7ca47fbf24f00a8376ec54120b1a2a335c
Because the MagnetoCorp admin has set CORE_PEER_ADDRESS=localhost:9051 to
target its commands to peer0.org2.example.com, the INFO 001 Installed remotely...
indicates that papercontract has been successfully installed on this peer.
After we install the smart contract, we need to approve the chaincode definition
for papercontract as MagnetoCorp. The first step is to find the packageID of
the chaincode we installed on our peer. We can query the packageID using the
peer lifecycle chaincode queryinstalled command:
peer lifecycle chaincode queryinstalled
The command will return the same package identifier as the install command. You should see output similar to the following:
Installed chaincodes on peer:
Package ID: cp_0:ffda93e26b183e231b7e9d5051e1ee7ca47fbf24f00a8376ec54120b1a2a335c, Label: cp_0
We will need the package ID in the next step, so we will save it as an environment variable. The package ID may not be the same for all users, so you need to complete this step using the package ID returned from your command window.
export PACKAGE_ID=cp_0:ffda93e26b183e231b7e9d5051e1ee7ca47fbf24f00a8376ec54120b1a2a335c
The admin can now approve the chaincode definition for MagnetoCorp using the
peer lifecycle chaincode approveformyorg command:
(magnetocorp admin)$ peer lifecycle chaincode approveformyorg --orderer localhost:7050 --ordererTLSHostnameOverride orderer.example.com --channelID mychannel --name papercontract -v 0 --package-id $PACKAGE_ID --sequence 1 --tls --cafile $ORDERER_CA
One of the most important chaincode parameters that channel members need to
agree to using the chaincode definition is the chaincode endorsement policy.
The endorsement policy describes the set of organizations that must endorse
(execute and sign) a transaction before it can be determined to be valid. By
approving the papercontract chaincode without the --policy flag, the
MagnetoCorp admin agrees to using the channel's default Endorsement policy,
which in the case of the mychannel test channel requires a
majority of organizations on the channel to endorse a transaction. All transactions,
whether valid or invalid, will be recorded on the ledger blockchain,
but only valid transactions will update the world state.
以 DigiBank 的身份安装和批准智能合约
Based on the mychannel LifecycleEndorsement policy, the Fabric Chaincode lifecycle
will require a majority of organizations on the channel to agree to the chaincode
definition before the chaincode can be committed to the channel.
This implies that we need to approve the papernet chaincode as both MagnetoCorp
and DigiBank to get the required majority of 2 out of 2. Open a new terminal
window in the fabric-samples and navigate to the folder that contains the
DigiBank smart contract and application files:
(digibank admin)$ cd commercial-paper/organization/digibank/
Use the script in the DigiBank folder to set the environment variables that will allow you to act as the DigiBank admin:
source digibank.sh
We can now install and approve papercontract as the DigiBank. Run the following
command to package the chaincode:
(digibank admin)$ peer lifecycle chaincode package cp.tar.gz --lang node --path ./contract --label cp_0
The admin can now install the chaincode on the DigiBank peer:
(digibank admin)$ peer lifecycle chaincode install cp.tar.gz
We then need to query and save the packageID of the chaincode that was just installed:
(digibank admin)$ peer lifecycle chaincode queryinstalled
Save the package ID as an environment variable. Complete this step using the package ID returned from your console.
export PACKAGE_ID=cp_0:ffda93e26b183e231b7e9d5051e1ee7ca47fbf24f00a8376ec54120b1a2a335c
The Digibank admin can now approve the chaincode definition of papercontract:
(digibank admin)$ peer lifecycle chaincode approveformyorg --orderer localhost:7050 --ordererTLSHostnameOverride orderer.example.com --channelID mychannel --name papercontract -v 0 --package-id $PACKAGE_ID --sequence 1 --tls --cafile $ORDERER_CA
将链码定义提交到通道
Now that DigiBank and MagnetoCorp have both approved the papernet chaincode, we
have the majority we need (2 out of 2) to commit the chaincode definition to the
channel. Once the chaincode is successfully defined on the channel, the
CommercialPaper smart contract inside the papercontract chaincode can be
invoked by client applications on the channel. Since either organization can
commit the chaincode to the channel, we will continue operating as the
DigiBank admin:
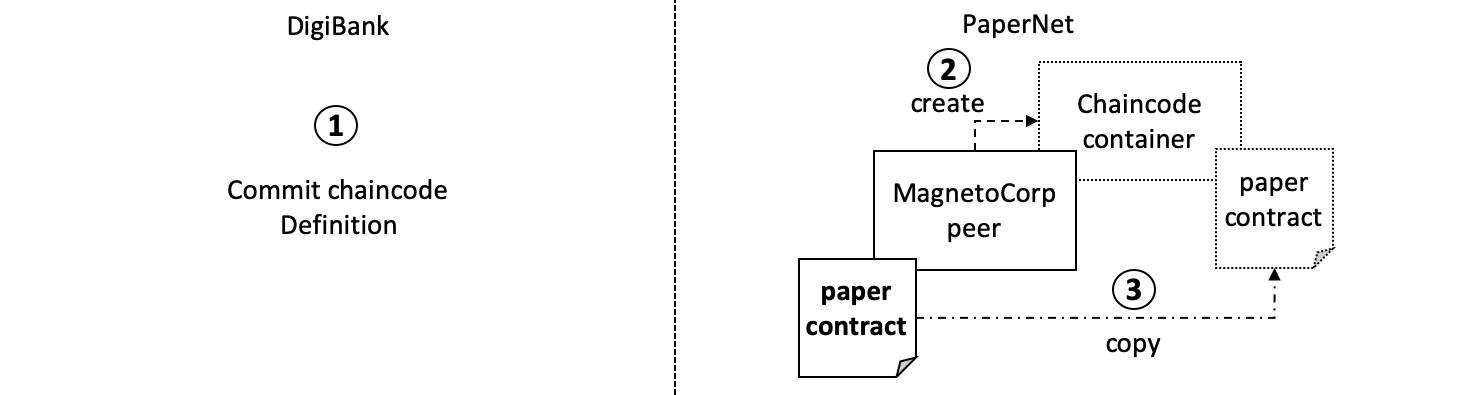 After the DigiBank administrator commits the definition of the
 papercontract chaincode to the channel, a new Docker chaincode container will be created to run papercontract on both PaperNet peers
The DigiBank administrator uses the peer lifecycle chaincode commit command
to commit the chaincode definition of papercontract to mychannel:
(digibank admin)$ peer lifecycle chaincode commit -o localhost:7050 --ordererTLSHostnameOverride orderer.example.com --peerAddresses localhost:7051 --tlsRootCertFiles ${PEER0_ORG1_CA} --peerAddresses localhost:9051 --tlsRootCertFiles ${PEER0_ORG2_CA} --channelID mychannel --name papercontract -v 0 --sequence 1 --tls --cafile $ORDERER_CA --waitForEvent
The chaincode container will start after the chaincode definition has been
committed to the channel. You can use the docker ps command to see
papercontract container starting on both peers.
(digibank admin)$ docker ps

CONTAINER ID        IMAGE                                                                                                                                                               COMMAND                  CREATED             STATUS              PORTS                                        NAMES
d4ba9dc9c55f        dev-peer0.org1.example.com-cp_0-ebef35e7f1f25eea1dcc6fcad5019477cd7f434c6a5dcaf4e81744e282903535-05cf67c20543ee1c24cf7dfe74abce99785374db15b3bc1de2da372700c25608   "docker-entrypoint.s…"   30 seconds ago      Up 28 seconds                                                    dev-peer0.org1.example.com-cp_0-ebef35e7f1f25eea1dcc6fcad5019477cd7f434c6a5dcaf4e81744e282903535
a944c0f8b6d6        dev-peer0.org2.example.com-cp_0-1487670371e56d107b5e980ce7f66172c89251ab21d484c7f988c02912ddeaec-1a147b6fd2a8bd2ae12db824fad8d08a811c30cc70bc5b6bc49a2cbebc2e71ee   "docker-entrypoint.s…"   31 seconds ago      Up 28 seconds                                                    dev-peer0.org2.example.com-cp_0-1487670371e56d107b5e980ce7f66172c89251ab21d484c7f988c02912ddeaec
Notice that the containers are named to indicate the peer that started it, and
the fact that it's running papercontract version 0.
Now that we have deployed the papercontract chaincode to the channel, we can
use the MagnetoCorp application to issue the commercial paper. Let's take a
moment to examine the application structure.
应用结构
包含在 papercontract 中的智能合约由 MagnetoCorp 的应用程序 issue.js 调用。Isabella 使用该程序向发行商业票据 00001 的账本提交一项交易。让我么来快速检验一下 issue 应用是怎么工作的。
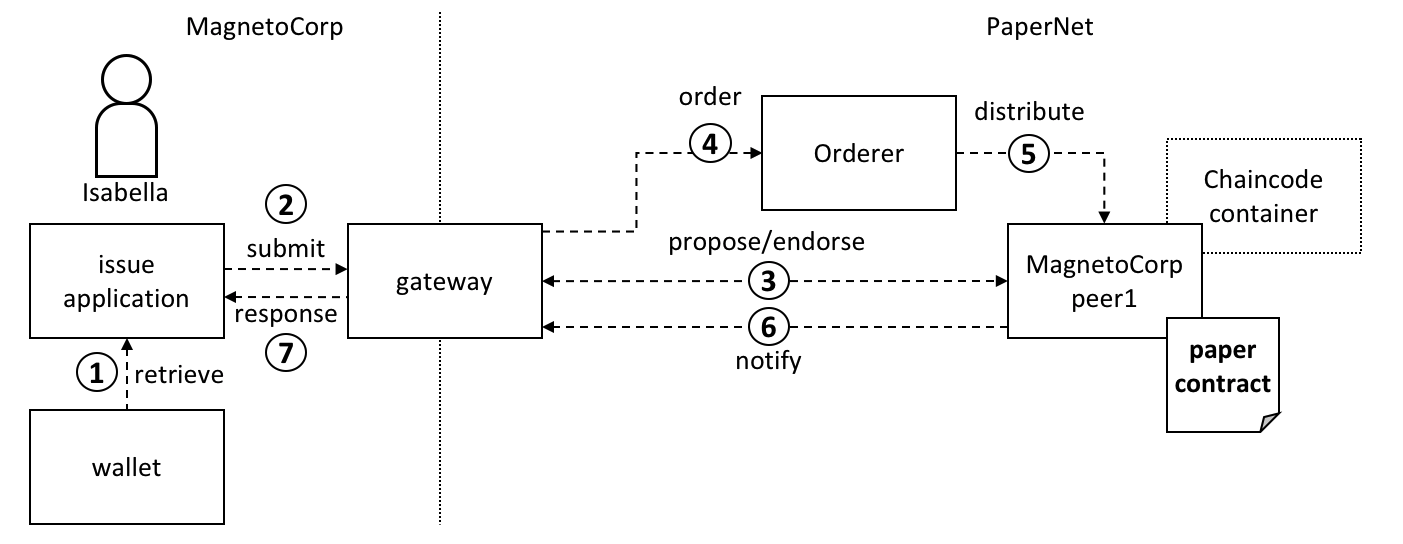 网关允许应用程序专注于交易的生成、提交和响应。它协调不同网络组件之间的交易提案、排序和通知处理。
issue 应用程序代表 Isabella 提交交易,它通过从 Isabella 的 钱包 中索取其 X.509 证书来开始运行,此证书可能储存在本地文件系统中或一个硬件安全模块 HSM 里。随后,issue 应用程序就能够利用网关在通道上提交交易。Hyperledger Fabric的软件开发包(SDK)提供了一个 gateway 抽象,因此应用程序在将网络交互托管给网关时能够专注于应用逻辑。网关和钱包使得编写 Hyperledger Fabric 应用程序变得很简单。
让我们来检验一下 Isabella 将要使用的 issue 应用程序,为其打开另一个终端窗口,在 fabric-samples 中找到 MagnetoCorp 的 /application 文件夹:
(isabella)$ cd commercial-paper/organization/magnetocorp/application/
(isabella)$ ls

enrollUser.js       issue.js        package.json
addToWallet.js 是 Isabella 将用来把自己的身份装进钱包的程序,而 issue.js 将使用这一身份通过调用 papercontract 来代表 MagnetoCorp 生成商业票据 00001。
切换至包含 MagnetoCorp 的 issue.js 应用程序副本的目录,并且使用你的代码编辑器检查此目录:
(isabella)$ cd commercial-paper/organization/magnetocorp/application
(isabella)$ code issue.js
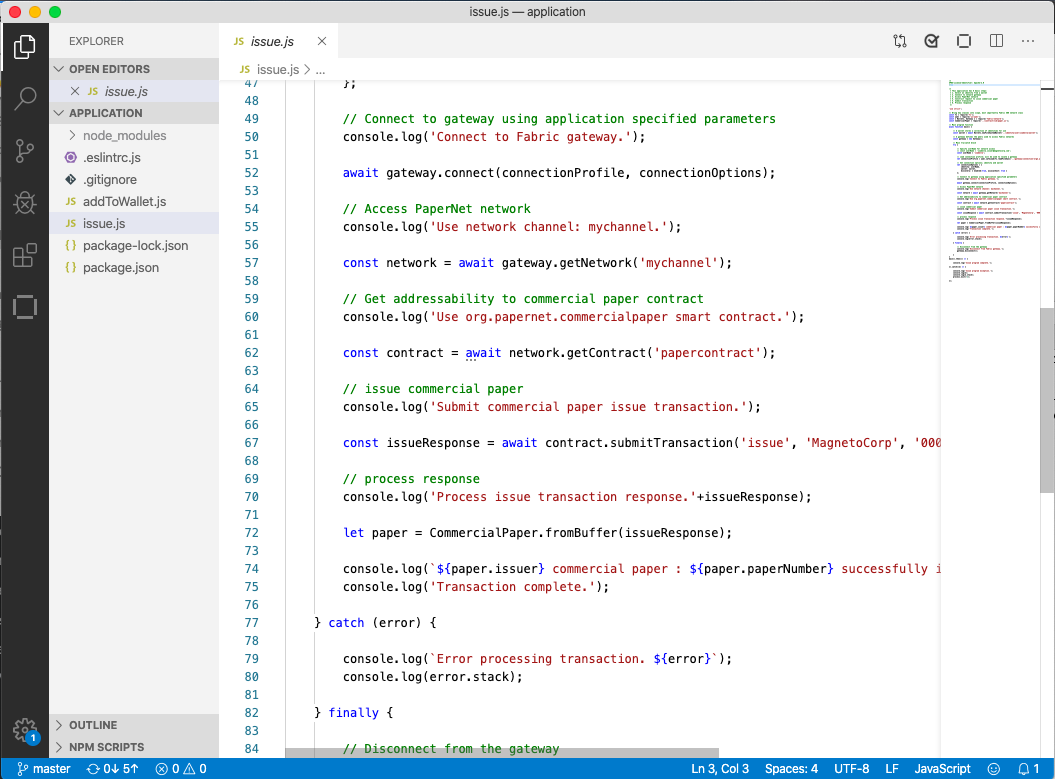
检查该目录;目录包含了 issue 应用程序和其所有依赖项。
 一个展示了商业票据应用程序目录内容的代码编辑器。
注意以下在 issue.js 中的关键程序行:
const { Wallets, Gateway } = require('fabric-network');
该语句把两个关键的 Hyperledger Fabric 软件开发包(SDK)类引入了 Wallet 和 Gateway 。
const wallet = await Wallets.newFileSystemWallet('../identity/user/isabella/wallet');
该语句表明了应用程序在连接到区块链网络通道上时将使用 Isabella 钱包。因为 Isabella 的 X.509 证书位于本地文件系统中,所以应用程序创建了一个 FileSystemWallet。应用程序会在 isabella 钱包中选择一个特定的身份。
await gateway.connect(connectionProfile, connectionOptions);
此行代码使用 connectionProfile 识别的网关来连接到网络,使用 ConnectionOptions 当中引用的身份。
看看 ../gateway/networkConnection.yaml 和 User1@org1.example.com 是如何分别被用于这些值的。
const network = await gateway.getNetwork('mychannel');
该语句是将应用程序连接到网络通道 mychannel 上, papercontract 之前就已经在该通道上部署过了。
const contract = await network.getContract('papercontract');
该语句是让应用程序可以访问由 papercontract 中的 org.papernet.commercialpaper 命名空间定义的智能合约。一旦应用程序请求了 getContract,那么它就能提交任意在其内实现的交易。
const issueResponse = await contract.submitTransaction('issue', 'MagnetoCorp', '00001', ...);
该行代码是使用在智能合约中定义的 issue 交易来向网络提交一项交易。MagnetoCorp ,00001... 都是被 issue 交易用来生成一个新的商业票据的值。
let paper = CommercialPaper.fromBuffer(issueResponse);
此语句是处理 issue 交易发来的响应。该响应需要从缓冲区被反序列化成 paper ,这是一个能够被应用程序准确解释的 CommercialPaper 对象。
欢迎检查 /application 目录下的其他文档来了解 issue.js 是如何工作的,并仔细阅读应用程序 主题 中关于如何实现 issue.js 的内容。
应用程序依赖
issue.js 应用程序是用 JavaScript 编写的,旨在作为 PaperNet 网络的客户端来在 node.js 环境中运行。按照惯例,会在多个网络外部的节点包上建立 MagnetoCorp 的应用程序,以此来提升开发的质量和速度。考虑一下 issue.js 是如何纳入 js-yaml
包 来处理 YAML 网关连接配置文件的,或者 issue.js 是如何纳入 fabric-network 包 来访问 Gateway 和 Wallet 类的:
const yaml = require('js-yaml');
const { Wallets, Gateway } = require('fabric-network');
需要使用 npm install 命令来将这些包装从 npm 下载到本地文件系统中。按照惯例,必须将包装安装进一个相对于应用程序的 /node_modules 目录中,以供运行时使用。
检查 package.json 文件来看看 issue.js 是如何通过识别包装来下载自己的准确版本的:
npm 版本控制功能非常强大;点击这里可以了解更多相关信息。
让我们使用 npm install 命令来安装这些包装,安装过程可能需要一分钟:
(isabella)$ cd commercial-paper/organization/magnetocorp/application/
(isabella)$ npm install

(           ) extract:lodash: sill extract ansi-styles@3.2.1
(...)
added 738 packages in 46.701s
看看这个命令是如何更新目录的:
(isabella)$ ls

enrollUser.js       node_modules            package.json
issue.js            package-lock.json
检查 node_modules 目录,查看已经安装的包。能看到很多已经安装了的包,这是因为 js-yaml 和 fabric-network 本身都被搭建在其他 npm 包中! package-lock.json 文件 能准确识别已安装的版本,如果你想用于生产环境的话,那么这一点对你来说就很重要。例如,测试、排查问题或者分发已验证的应用。
钱包
Isabella 马上就能够运行 issue.js 来发行 MagnetoCorp 商业票票据 00001 了;现在还剩最后一步!因为 issue.js 代表 Isabella,所以也就代表 MagnetoCorp, issue.js 将会使用 Isabella 钱包中反应以上事实的身份。现在我们需要执行这个一次性的活动,向 Isabella 的钱包中添 X.509 证书。
The MagnetoCorp Certificate Authority running on PaperNet, ca_org2, has an
application user that was registered when the network was deployed. Isabella
can use the identity name and secret to generate the X.509 cryptographic material
for the issue.js application. The process of using a CA to generate client side
cryptographic material is referred to as enrollment. In a real word scenario,
a network operator would provide the name and secret of a client identity that
was registered with the CA to an application developer. The developer would then
use the credentials to enroll their application and interact with the network.
The enrollUser.js program uses the fabric-ca-client class to generate a private
and public key pair, and then issues a Certificate Signing Request to the CA.
If the identiy name and secret submitted by Isabella match the credentials
registered with the CA, the CA will issue and sign a certificate that encodes the
public key, establishing that Isabella belongs to MagnetoCorp. When the signing
request is complete, enrollUser.js stores the private key and signing certificate
in Isabella's wallet. You can examine the enrollUser.js file to learn more about
how the Node SDK uses the fabric-ca-client class to complete these tasks.
在 Isabella 的终端窗口中运行 addToWallet.js 程序来把身份信息添加到她的钱包中:
(isabella)$ node enrollUser.js

Wallet path: /Users/nikhilgupta/fabric-samples/commercial-paper/organization/magnetocorp/identity/user/isabella/wallet
Successfully enrolled client user "isabella" and imported it into the wallet
We can now turn our focus to the result of this program --- the contents of the wallet which will be used to submit transactions to PaperNet:
(isabella)$ ls ../identity/user/isabella/wallet/

isabella.id
Isabella can store multiple identities in her wallet, though in our example, she
only uses one. The wallet folder contains an isabella.id file that provides
the information that Isabella needs to connect to the network. Other identities
used by Isabella would have their own file. You can open this file to see the
identity information that issue.js will use on behalf of Isabella inside a JSON
file. The output has been formatted for clarity.
(isabella)$  cat ../identity/user/isabella/wallet/*

{
  "credentials": {
    "certificate": "-----BEGIN CERTIFICATE-----\nMIICKTCCAdCgAwIBAgIQWKwvLG+sqeO3LwwQK6avZDAKBggqhkjOPQQDAjBzMQsw\nCQYDVQQGEwJVUzETMBEGA1UECBMKQ2FsaWZvcm5pYTEWMBQGA1UEBxMNU2FuIEZy\nYW5jaXNjbzEZMBcGA1UEChMQb3JnMi5leGFtcGxlLmNvbTEcMBoGA1UEAxMTY2Eu\nb3JnMi5leGFtcGxlLmNvbTAeFw0yMDAyMDQxOTA5MDBaFw0zMDAyMDExOTA5MDBa\nMGwxCzAJBgNVBAYTAlVTMRMwEQYDVQQIEwpDYWxpZm9ybmlhMRYwFAYDVQQHEw1T\nYW4gRnJhbmNpc2NvMQ8wDQYDVQQLEwZjbGllbnQxHzAdBgNVBAMMFlVzZXIxQG9y\nZzIuZXhhbXBsZS5jb20wWTATBgcqhkjOPQIBBggqhkjOPQMBBwNCAAT4TnTblx0k\ngfqX+NN7F76Me33VTq3K2NUWZRreoJzq6bAuvdDR+iFvVPKXbdORnVvRSATcXsYl\nt20yU7n/53dbo00wSzAOBgNVHQ8BAf8EBAMCB4AwDAYDVR0TAQH/BAIwADArBgNV\nHSMEJDAigCDOCdm4irsZFU3D6Hak4+84QRg1N43iwg8w1V6DRhgLyDAKBggqhkjO\nPQQDAgNHADBEAiBhzKix1KJcbUy9ey5ulWHRUMbqdVCNHe/mRtUdaJagIgIgYpbZ\nXf0CSiTXIWOJIsswN4Jp+ZxkJfFVmXndqKqz+VM=\n-----END CERTIFICATE-----\n",
    "privateKey": "-----BEGIN PRIVATE KEY-----\nMIGHAgEAMBMGByqGSM49AgEGCCqGSM49AwEHBG0wawIBAQQggs55vQg2oXi8gNi8\nNidE8Fy5zenohArDq3FGJD8cKU2hRANCAAT4TnTblx0kgfqX+NN7F76Me33VTq3K\n2NUWZRreoJzq6bAuvdDR+iFvVPKXbdORnVvRSATcXsYlt20yU7n/53db\n-----END PRIVATE KEY-----\n"
  },
  "mspId": "Org2MSP",
  "type": "X.509",
  "version": 1
}
In the file you can notice the following:
-
a
"privateKey":used to sign transactions on Isabella's behalf, but not distributed outside of her immediate control. -
a
"certificate":which contains Isabella's public key and other X.509 attributes added by the Certificate Authority at certificate creation. This certificate is distributed to the network so that different actors at different times can cryptographically verify information created by Isabella's private key.
点击此处获取更多关于证书信息。在实践中,证书文档还包含一些 Fabric 专门的元数据,例如 Isabella 的组织和角色——在钱包主题阅读更多内容。
发行应用
Isabella 现在可以用 issue.js 来提交一项交易,该交易将发行 MagnetoCorp 商业票据 00001:
(isabella)$ node issue.js

Connect to Fabric gateway.
Use network channel: mychannel.
Use org.papernet.commercialpaper smart contract.
Submit commercial paper issue transaction.
Process issue transaction response.{"class":"org.papernet.commercialpaper","key":"\"MagnetoCorp\":\"00001\"","currentState":1,"issuer":"MagnetoCorp","paperNumber":"00001","issueDateTime":"2020-05-31","maturityDateTime":"2020-11-30","faceValue":"5000000","owner":"MagnetoCorp"}
MagnetoCorp commercial paper : 00001 successfully issued for value 5000000
Transaction complete.
Disconnect from Fabric gateway.
Issue program complete.
node 命令初始化一个 node.js 环境,并运行 issue.js。从程序输出我们能看到,系统发行了一张 MagnetoCorp 商业票据 00001,面值为 500 万美元。
如您所见,为实现这一点,应用程序调用了 papercontract.js 中 CommercialPaper 智能合约里定义的 issue 交易。MagnetoCorp 管理员已经在网络上安装并实例化了 CommercialPaper 智能合约。在世界状态里作为一个矢量状态来代表新的商业票据的是通过 Fabric 应用程序编码端口(API)来与账本交互的智能合约,其中最显著的 API 是 putState() 和 getState()。我们即将看到该矢量状态在随后是如何被 buy 和 redeem 交易来操作的,这两项交易同样也是定义在那个智能合约中。
潜在的 Fabric 软件开发包(SDK)一直都在处理交易的背书、排序和通知流程,使得应用程序的逻辑变得简单明了; SDK 用网关提取出网络细节信息和连接选项 ,以此来声明更先进的流程策略,如交易重试。
现在让我们将重点转换到 DigiBank(将购买商业票据),以遵循 MagnetoCorp 00001 的生命周期。
DigiBank应用
Balaji 使用 DigiBank 的 buy 应用程序来向账本提交一项交易,该账本将商业票据 00001 的所属权从 MagnetoCorp 转向 DigiBank。 CommercialPaper 智能合约与 MagnetoCorp 应用程序使用的相同,但是此次的交易不同,是 buy 交易而不是 issue 交易。让我们检查一下 DigiBank 的应用程序是怎样工作的。
为 Balaji 打开另一个终端窗口。 在 fabric-samples 中,切换到包含 buy.js 应用程序的 DigiBank 应用程序目录,并用编辑器打开该目录:
(balaji)$ cd commercial-paper/organization/digibank/application/
(balaji)$ code buy.js
如你所见,该目录同时包含了 Balaji 将使用的 buy 和 redeem 应用程序 。
 DigiBank 的商业票据目录包含
 buy.js 和 redeem.js 应用程序。
DigiBank 的 buy.js 应用程序在结构上与 MagnetoCorp的 issue.js 十分相似,但存在两个重要的差异:
-
身份:用户是 DigiBank 的用户
Balaji而不是 MagnetoCorp 的IsabellaJavaScript const wallet = await Wallets.newFileSystemWallet('../identity/user/balaji/wallet');看看应用程序在连接到 PaperNet 网络上时是如何使用
balaji钱包的。buy.js在balaji钱包里选择一个特定的身份。 -
交易:被调用的交易是
buy而不是issueJavaScript const buyResponse = await contract.submitTransaction('buy', 'MagnetoCorp', '00001', ...);提交一项
buy交易,其值为MagnetoCorp,00001...,CommercialPaper智能合约类使用这些值来将商业票据00001的所属权转换成 DigiBank。
欢迎检查 application 目录下的其他文档来理解应用程序的工作原理,并仔细阅读应用程序主题中关于如何实现 buy.js 的内容。
以 DigiBank 的身份运行
负责购买和赎回商业票据的 DigiBank 应用程序的结构和 MagnetoCorp 的发行交易十分相似。所以,我们来安装这些应用程序 的依赖项,并搭建 Balaji 的钱包,这样一来,Balaji 就能使用这些应用程序购买和赎回商业票据。
和 MagnetoCorp 一样, Digibank 必须使用 npm install 命令来安装规定的应用包,同时,安装时间也很短。
在 DigiBank 管理员窗口安装应用程序依赖项:
(digibank admin)$ cd commercial-paper/organization/digibank/application/
(digibank admin)$ npm install

(            ) extract:lodash: sill extract ansi-styles@3.2.1
(...)
added 738 packages in 46.701s
在 Balaji 的终端窗口运行 addToWallet.js 程序,把身份信息添加到他的钱包中:
addToWallet.js 程序为 balaji 将其身份信息添加到他的钱包中, buy.js 和 redeem.js 将使用这些身份信息来向 PaperNet 提交交易。
(balaji)$ node enrollUser.js

Wallet path: /Users/nikhilgupta/fabric-samples/commercial-paper/organization/digibank/identity/user/balaji/wallet
Successfully enrolled client user "balaji" and imported it into the wallet
The addToWallet.js program has added identity information for balaji, to his
wallet, which will be used by buy.js and redeem.js to submit transactions to
PaperNet.
Like Isabella, Balaji can store multiple identities in his wallet, though in our
example, he only uses one. His corresponding id file at
digibank/identity/user/balaji/wallet/balaji.id is very similar Isabella's ---
feel free to examine it.
购买应用
Balaji 现在可以使用 buy.js 来提交一项交易,该交易将会把 MagnetoCorp 商业票据 00001 的所属权转换成 DigiBank。
在 Balaji 的窗口运行 buy 应用程序:
(balaji)$ node buy.js

Connect to Fabric gateway.
Use network channel: mychannel.
Use org.papernet.commercialpaper smart contract.
Submit commercial paper buy transaction.
Process buy transaction response.
MagnetoCorp commercial paper : 00001 successfully purchased by DigiBank
Transaction complete.
Disconnect from Fabric gateway.
Buy program complete.
你可看到程序输出为:Balaji 已经代表 DigiBank 成功购买了 MagnetoCorp 商业票据 00001。 buy.js 调用了 CommercialPaper 智能合约中定义的 buy 交易,该智能合约使用 Fabric 应用程序编程接口(API) putState() 和 getState() 在世界状态中更新了商业票据 00001 。如您所见,就智能合约的逻辑来说,购买和发行商业票据的应用程序逻辑彼此十分相似。
兑换应用
商业票据 00001 生命周期的最后一步交易是 DigiBank 从 MagnetoCorp 那里收回商业票据。Balaji 使用 redeem.js 提交一项交易来执行智能合约中的收回逻辑。
在Balaji的窗口运行 redeem 交易:
(balaji)$ node redeem.js

Connect to Fabric gateway.
Use network channel: mychannel.
Use org.papernet.commercialpaper smart contract.
Submit commercial paper redeem transaction.
Process redeem transaction response.
MagnetoCorp commercial paper : 00001 successfully redeemed with MagnetoCorp
Transaction complete.
Disconnect from Fabric gateway.
Redeem program complete.
同样地,看看当 redeem.js 调用了 CommercialPaper 中定义的 redeem 交易时,商业票据 00001 是如何被成功收回的。 redeem 交易在世界状态中更新了商业票据 00001 ,以此来反映商业票据的所属权又归回其发行方 MagnetoCorp。
Clean up
When you are finished using the Commercial Paper tutorial, you can use a script to clean up your environment. Use a command window to navigate back to the root directory of the commercial paper sample:
cd fabric-samples/commercial-paper
You can then bring down the network with the following command:
./network-clean.sh
This command will bring down the peers, CouchDB containers, and ordering node of the network, in addition to the logspout tool. It will also remove the identities that we created for Isabella and Balaji. Note that all of the data on the ledger will be lost. If you want to go through the tutorial again, you will start from a clean initial state.
下一步
要想更深入地理解以上教程中所介绍的应用程序和智能合约的工作原理,可以参照 开发应用程序。该主题将为您详细介绍商业票据场景、PaperNet 商业网络,网络操作者以及它们所使用的应用程序和智能合约的工作原理。
欢迎使用该样本来开始创造你自己的应用程序和智能合约!